In our earlier posts , we looked at the features, advantages, and limitations of Adapt and Evolve authoring tools for responsive eLearning.
In this post, we’ll take a look at the latest version of Lectora (version 16), through which we can develop responsive output for smartphones, tablets, and desktops.
Lectora 16
Lectora was the first authoring tool to publish output in HTML and also to deliver HTML5 output for mobile devices. The latest release now incorporates a new design approach called “Responsive Course Design” (RCD). Let’s see the reasons for its emergence.
The Drawback of Responsive Design
Many of us are already aware of responsive design, which is widely followed nowadays to design content usable across a variety of devices, including smartphones, tablets, and desktop computers. The idea of responsive design is to give the best content experience on every device with the least zooming or panning.
Responsive design is based on a fluid grid layout which responds to the width of the device on which the content is viewed. As the view area (width) changes, the content is repositioned to allow the user to view the content without the need to zoom or scroll horizontally.
This is managed through CSS3 media queries on ‘width’, which return the CSS pixel width of the screen – i.e. the logical screen width. Breakpoints based on logical width define which layout to display.
Nowadays there are a huge number of devices in the market with different screen resolutions and physical sizes, and therefore different CSS pixel widths; and with smaller devices having increasingly higher resolutions, you can end up with a phone, for example, that has the same logical width as a tablet. The same breakpoint becomes applicable for both devices, and the same layout is rendered on both. However, since the layout was designed keeping tablet width in mind, it may not fit properly into the phone’s width. Relative positioning of content elements may be affected, leading to a sub-optimal viewing experience.
To avoid these issues and give the same experience on one type of device, Lectora came up with the concept of RCD.
Features:
Responsive Course Design (RCD):
In RCD, you design for device type and orientation, instead of screen width. This gives you five possible default views to design for:
- Desktop (1009 x 662)
- Tablet Landscape (1009 x 662)
- Tablet Portrait (785 x 1000)
- Phone Landscape (785 x 450)
- Phone Portrait (480 x 763)
With these five views you can design for all devices.
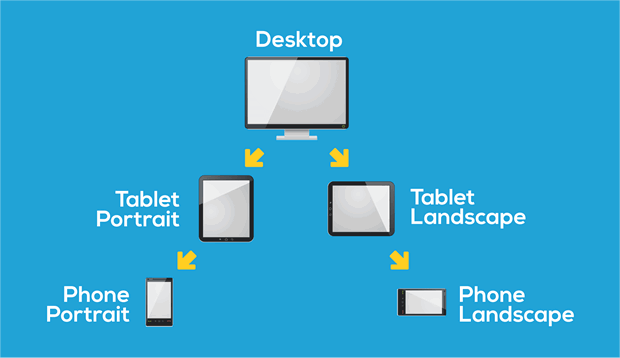
Inheritance Model
Lectora follows the “desktop first” approach with an inheritance model as show in the figure given below.
 Reference : http://trivantis.com/whitepapers/responsive-course-design
All views except the desktop view have fixed widths. Any change you make to the desktop width is automatically mirrored in the tablet landscape width. You can change the height for all views.
It is suggested that you first design the desktop view for the page. The content for the other views will be automatically repositioned and resized. You can then review and customize each view as desired by repositioning, hiding, or removing elements.
Thereafter, any changes you make to the desktop view will automatically be carried only to the tablet landscape and portrait views. If you want these to reflect in the phone landscape and portrait views as well, you’ll need to do that manually.
Any changes made to the tablet portrait mode are automatically carried to the phone portrait mode but do not reflect in any other views; similarly any changes made to the tablet landscape view are automatically carried to the phone landscape view only.
Any changes to the phone portrait or landscape views reflect only on those individual views.
Controlling the Content:
Lectora 16 allows developers to define variables and detect device type and orientation. With the help of this information you can control what content is provided for learners on different devices and orientations. You can also use device information to define different behavior for the same content – for example, content about three types of animals may be shown as graphics and text on a desktop and tablet, but as an accordion interactivity on phones.
Themes:
Lectora offers huge list of prebuilt themes designed keeping RCD in mind. You can also create your own themes. It’s important to set up all your titles, navigation, and background images in such a way that they work smoothly across all views.
Page Layouts:
Lectora offers page layouts specifically designed for RCD. Each layout includes one or more Lectora content element types arranged in a particular manner and has specific properties for all five views. You can also create your own page layouts and save them to use in other courses.
Cross-Device Moving and Resizing:
When you work with RCD, you are working to design content for five views; so changing the position and size of an element across these views could be a time -consuming task. With this feature, you can quickly and easily change the position and size of a content element across all the views at one go. This applies only for default layouts; if you’ve customized your design for any view, you’ll need to make manual adjustments.
Fonts:
Fonts play a crucial role when it comes to design and readability. Lectora suggests using web-safe fonts so that your text style is accurately displayed on the maximum devices.
Background Images:
Lectora 16 allows you to add background images at course and page level.
Footer Navigation:
It’s important to always keep the navigation elements at the bottom in all views irrespective of the screen height. Lectora always had an “Offset from bottom” option to set the position and size for all objects. With RCD, this option becomes especially relevant for footers. Enabling it sets the “Y” position of the element from the bottom of the page. This will help to keep the bottom navigation element in the same place relative to the bottom of the page on any device.
Text Wrapping Around Images:
While Lectora has always had an option to wrap text around an image, this has acquired increased importance in RCD. You need to place the image over the textbox in the layering order, and enable the wrap option. This will cause the text to automatically flow around the image in each view.
Audio/Video Support:
Lectora now supports HTML5 audio and video tags, eliminating the need for Flash player. If your course is viewed in IE8, there is an automatic fallback to Flash.
Menu:
Lectora has a prebuilt tree menu. You can change the background color of the menu popup box, as well as the color of the menu items.
Templates:
Lectora has prebuilt templates for different question types.
Inline Variable Replacement:
It’s very important to have dynamic content in the course to show learner specific information – e.g. learner name, score, etc. The variable replacement feature makes it very easy to add user info directly into text blocks and generate content dynamically based on user responses to interactions.
Improvements:
Additionally, Lectora has improved some of its features from the previous versions:
- Test Results: You can now display assessment results as a page in the course rather than in a popup.
- Likert Questions: These have been reformatted into a single object, making it easier to create, edit, move, and share them.
- Bullets and Numbered Lists: Lectora 16.1 supports HTML5 rendering of bullets and numbered lists including right-alignment of numbers and Roman numerals. This gives more control over design.
- Additional Status Indicator Objects: Lectora has added 50 more status indicator sets, such as three-cut pie, bullseye, hourglass, and progress meters.
- Enhanced Progress Bar Action: With the Step Progress Bar Position action, you can now easily set the progress to step forward or backward, eliminating the need for special variable actions.
- Increase/Decrease Text Size: A new font size scaling slider allows you to quickly increase or decrease the point size of text, saving on clicks and development time.
- Quick Tour: This helps you to quickly familiarize yourself with the areas and ribbons of the Lectora interface.
- Compatibility with Lectora Online 3: You can now export a course to an online package file and import it to Lectora Online 3, and vice versa.
Observations/Limitations:
-
- Lectora has a prebuilt tree menu. There are quite a few restrictions when it comes to the design and layout of this menu. You can only change the color of the menu item text and menu popup box background. Also, if you want to create a custom tree menu, then Lectora will not support vertical scrolling in the menu popup box. This means that in case of a longer course, when you expand the menu, you won’t be able to see all the menu items.
- When setting the page height for interactive pages, you need to factor in the height of the content that will be revealed on user interaction. This means that when the page first loads, it can seem like there’s a lot of extra space at the bottom, and content has been squished at the top.
- Some browsers on iOS and Android devices do not auto-play audio and video files. Lectora does not provide any easy way of handling this. So one solution can be to add a “Play” button prominently on each page to play the audio file for that page. For videos, in most cases, we tend to overlay a “Play” button anyways. However, note that closed captions for videos only work on iPhones and iPads.
- Lectora 16 doesn’t provide a way to edit cue points for audio synching. Once cue points are added in the original audio file and the file is saved, an mp3 file is generated which contains meta data about these cue points. If you want to add, delete, or modify cue points, you need to reopen the original audio file, put ALL the cue points back in (with edits), and an updated mp3 file will again be generated. One stop gap solution we found was to open the first mp3 file in an audio editing software (e.g. Audacity), manually edit the cue point data and save the file; and then replace the mp3 file in Lectora with the updated one.
- Pages with heavy media (images, audio, and videos) or a lot of visual elements will tend to load very slowly on devices.
- Lectora’s 16.1 update doesn’t load images placed outside the stage area. This creates a problem with interactivities where some part of the content must be kept outside the stage/viewable area – for example, a ‘comic strip’ interactivity where only one frame of the comic strip is visible at a time, and other frames appear in the viewable area when the user presses next or back. On such a page, any text in the frames will be displayed; however, the background images in other frames will not be shown. Or, if the entire comic strip is made up of images only, then only the first frame will be shown.
- When text is placed over a background shape or image, its alignment with respect to its backgrounds changes in different views.
- With responsive content, it is sometimes necessary to disable the pinch and zoom feature; however, Lectora does not provide an option for this. Also, with the pinch and zoom feature retained, if you change the device orientation a couple of times, the content gets automatically zoomed in.
- Bottom navigation (global elements) remains at the bottom of the content or defined page height; whereas ideally it should remain at the bottom of the screen irrespective of content or page height.
- If the accessibility feature is enabled, a hand cursor is shown on each image in the course. This gives the impression that the image can be clicked – which is not the case.
- While Lectora provides support only for web-safe fonts, you can still use custom fonts through one of the following ways:1.Converting all Text to Images: This is a quick and easy solution. You just need to check the “Convert to Image” box in the textbox properties and all the text in the course will get converted into images. However, this means you end up with many image files, which makes the course heavier. There is also a risk that the text will not look crisp on higher resolution devices; also, as it is an image, it will not be possible to copy the text.
2.Using Google font API: You can use fonts directly from the Google font site. However, in such cases, you need to ensure that this site is accessible from wherever the course is hosted.
3.Embed web fonts: You can convert your custom font TTF file into different font formats using Font Squirrel’s Webfont Generator. This will generate a stylesheet and a collection of font files. Then, add an external HTML object at the top level of your course and set it to “Meta Tags” type. Next, edit that HTML object and add the path of the stylesheet generated using the tag. Finally, using the “Add additional files” option, add the folder containing the font files that were generated.
- While Lectora does not offer any ready-made presentation templates, it does allow you to create your own interactive and non-interactive templates and import them into multiple courses.
- When adding background images in a Lectora RCD course, – or for that matter any responsive course, you need to use an image that is very large and covers both the landscape and portrait modes of the devices. If you choose to scale this proportionately, there is a risk that the entire screen area will not be covered. Else, by fixing either the width or the height, there is a risk of the image getting stretched.This can be handled by breaking the image into three parts: Header, footer, and content area. You can create header and footer images suitable for desktop view and add them at the course level. The body image should be small and set to “repetitive” so that it covers the full width and height of the content area in each view. Note, however, that this approach is suitable for patterned images; however, it will not work in the case of photographs.
Offline Use:
The current version of Lectora does not allow learners to view courses when offline.
If you don’t need learner progress to be tracked, you do have an option to publish Lectora content for offline use on CD-ROMs and flash drives, or share the content on internal networks. However, note that when viewing content in these offline situations, you will only be able to access it through desktop computers.
Platform Support:
Lectora 16 output works on following platforms:
-
-
- Chrome (any version)
- Firefox (any version)
- IE 8+
- Safari (any version)
-
For iOS and Android mobile devices:
-
-
- Default browser, Chrome, and Firefox on latest OS versions
-
Note: You may require IE 10 or above to view certain features like reflections, opacity, etc.
Conclusion:
Lectora 16 with RCD works well for both long and short courses, and supports close (line-by-line) synching of audio with on-screen content.
Since Lectora 16 is not template-based, there is more flexibility to design custom layouts and interactivities. The flip side is that this increases the development time, as compared to tools like Evolve or Adapt.
Lectora 16 has inbuilt tools for recording simulations. It supports simple animations, and also allows you to import complex animations as HTML canvas animations – for example, you can create an animation in Adobe Animate CC and import it into Lectora 16.
By displaying content based on device type and orientation, Lectora 16 ensures two things: first, that the best layout for each device is displayed; and second, that there is a consistent layout for each device and orientation – so content is displayed in the same way on all phones in landscape view, for example, rather having different displays based on each phone’s landscape logical width.
In our next post, we’ll look at the latest version of Elucidat.